Roughly 85% of social video is watched on mute. If your captions are missing, mistimed or hard to read, viewers swipe past before they hear a word. The good news: in 2025 you have four genuinely good ways to add captions, and you no longer need an editor to do it well.
This guide covers all four methods — what each one costs, how long it takes, when it produces the best result, and the specific mistakes that ruin captions in each path. By the end you'll know exactly which workflow fits your video and your time budget.
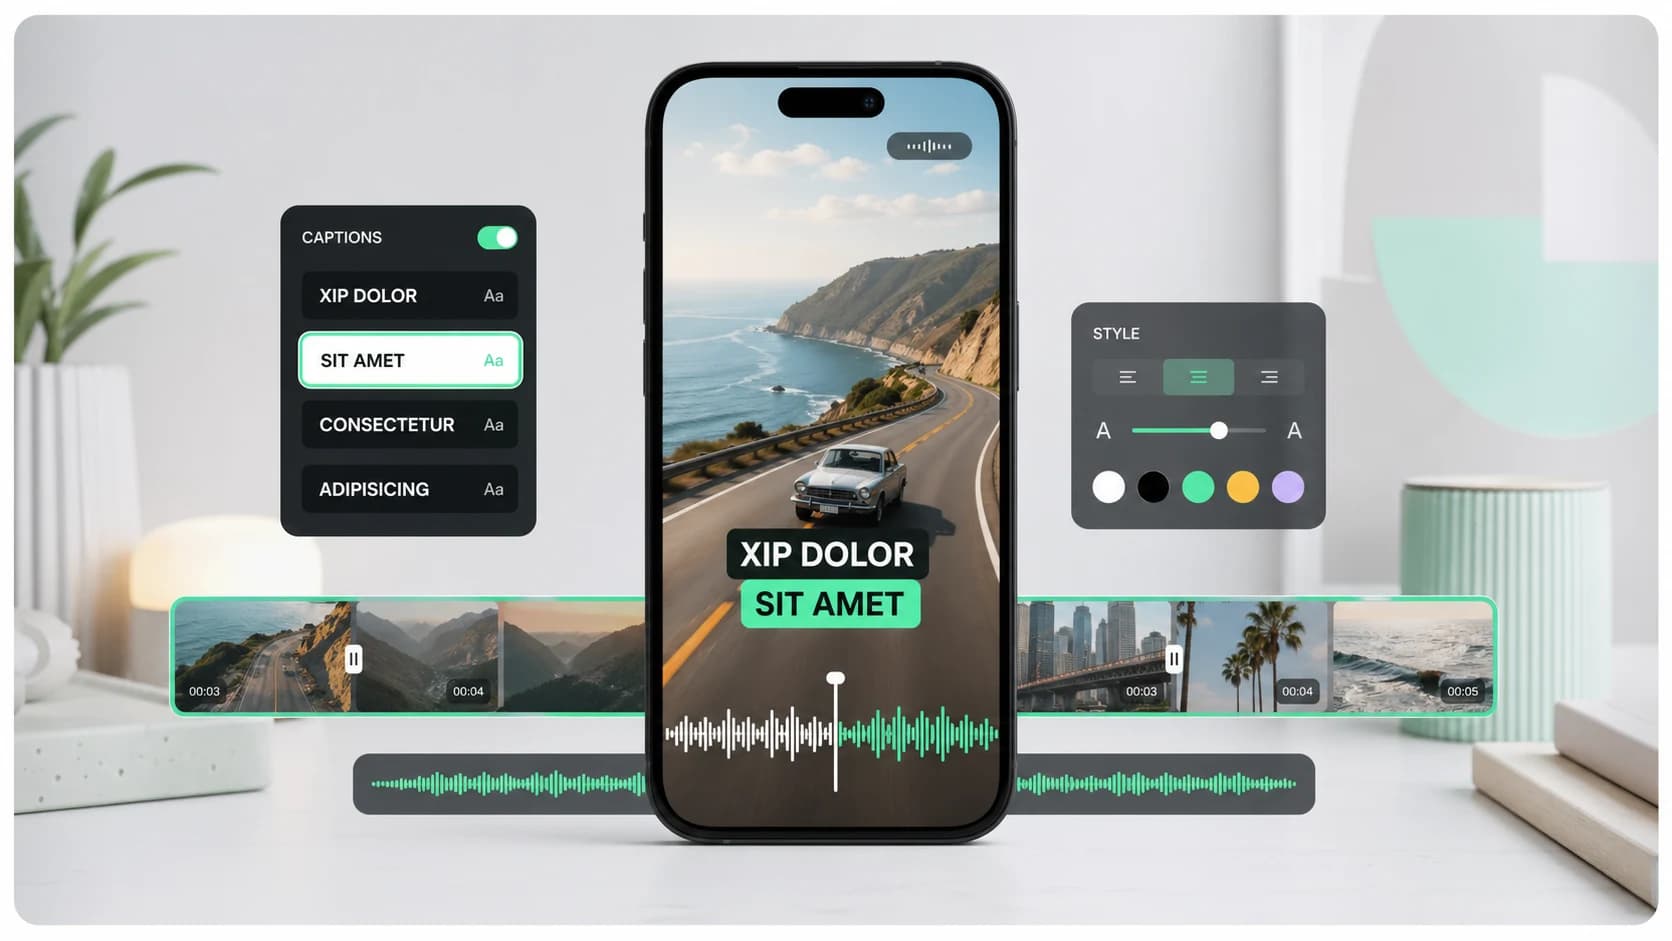
Method 1 — AI caption tools
AI caption tools (SoCaptions, CapCut, Descript, Submagic) generate a word-level timed transcript from your audio in 10–60 seconds, then let you pick a styled preset and export an MP4. They are the default choice for short-form video in 2025.
- Time per clip: 1–3 minutes total, including light edits.
- Accuracy: 92–97% for clean studio audio, 80–88% for noisy field recordings.
- Cost: $0–$30/month depending on tool.
- Best for: Reels, TikTok, Shorts, podcast clips, talking-head videos.
The work shifts from typing to taste. The model handles the boring part (timing each word to ±50ms), and you spend your effort on the part that actually drives views: the visual style. That trade is the entire reason this category exploded.
Method 2 — Platform auto-captions
TikTok, Instagram Reels, YouTube Shorts and LinkedIn all generate captions automatically when you upload. They cost nothing, they appear without setup, and they unlock the silent-scroll audience instantly.
The catch: they only exist on that one platform. The captions are baked into the player, not the file. Cross-post the same MP4 to a second platform and you start from zero. They're also visually plain — usually white text in the platform's default sans — so they don't carry brand and they get lost on bright backgrounds.
If you forget to caption a clip before posting, switch on the platform's auto-captions in the upload screen. Don't rely on them as your primary plan — you'll lose every cross-post.
Method 3 — Manual SRT files
An SRT is a plain-text file with timestamps and lines of dialogue. You write it in a text editor (or in Premiere / Final Cut / DaVinci) and burn it into the video on export. This is how television and film have done captions for decades.
- Time per minute of video: 4–6 minutes of typing for a clean speaker, 8–10 minutes for accented or fast speech.
- Accuracy: 99%+ if you proofread.
- Cost: $0 — but your time is the cost.
- Best for: long-form interviews, documentary footage, broadcast deliverables.
Manual SRT is the slowest option, but it's the only one that gives you exact control over line breaks, reading speed (the industry rule is ~17 characters per second), and on-screen positioning. For anything destined for broadcast, manual is still the standard.
Method 4 — Captioning services
Services like Rev, 3Play and Verbit hand your audio to a human transcriber and return a finished SRT or VTT file. Pricing is per minute of video, usually $1.00–$3.00.
- Turnaround: 2–24 hours.
- Accuracy: 99%.
- Cost: $1–$3 per minute.
- Best for: legal, medical, multi-language, FCC-compliant captions.
If you have a regulatory requirement (broadcast, healthcare, courts) or a multi-language workflow, services are still worth the money. For everything else, AI has closed the quality gap.
Choosing the right method
Use this decision tree on every clip. It's the same one we walk new SoCaptions users through:
- 01Is the video under 90 seconds and headed for short-form social? Use an AI caption tool.
- 02Is it a long-form interview or documentary? Start with AI, then manually clean the transcript.
- 03Is it a regulated deliverable (broadcast, legal, medical)? Use a captioning service.
- 04Is it a one-off post you'll never cross-post? Platform auto-captions are fine.
Five mistakes that ruin captions, regardless of method
- Timing drift — captions land 200ms after the word. Always preview at 1× speed before exporting.
- Reading speed too high — more than ~17 characters per second forces viewers to choose between watching and reading.
- No stroke or background — white text dies on a bright sky. Always add a 1–2px black stroke or a subtle box.
- Captions over the safe zone — text under the bottom 12% of the frame gets covered by platform UI on TikTok and Reels.
- Same style across every video — viewers learn your brand by repetition. Pick one style and stick with it for at least 30 days.
What to look for in any tool
Whichever method you pick, the same four features separate good tools from bad ones. If a product is missing any of these, keep looking:
- 01Word-level timing, not whole-sentence chunks. This is what makes karaoke and word-by-word styles possible.
- 02MP4 export with no watermark on every paid tier.
- 03An editable transcript — you'll always need to fix one or two words. A read-only transcript is a deal-breaker.
- 04A small, opinionated set of styles. Tools that ship 60 styles tend to ship 60 mediocre ones. Three great ones beat sixty average ones.
That's the entire shopping list. Once a tool clears those four bars, the rest is preference — pricing, UI taste, and which platforms it exports to in one click.
The 2025 default
For 90% of creators today, the answer is: AI tool for short-form, AI + manual cleanup for long-form, services only when compliance forces your hand. Five years ago this advice would have been wrong. The accuracy curve on word-level transcription crossed the threshold around 2023, and once it did, the calculus flipped permanently.
The fastest way to understand the trade-offs is to caption the same 30-second clip with two methods and compare. Most creators discover their preference within one afternoon.